Introduction
One of the main differences between an aspiring data scientist and a professional is the lack of experience working on a project from the beginning to the very end. While working on my first data science job in 2017, I wanted to get such experience faster and thus started working on this pet-project. It took me a couple of months to do it, and I have learned a lot of useful and interesting skills:
- how to collect, process, and manage the data;
- how to use Amazon S3 for saving the data and models;
- how to make a website with Flask and how to host in on Heroku. How to make in on mobile devices;
- how to augment images manually;
- how to implement online learning in NumPy and TensorFlow;
In 2019, I decided to make a new version. The core idea was the same, but I also added a possibility to separately recognize several drawn digits and rewrote the code for neural nets in Pytorch.
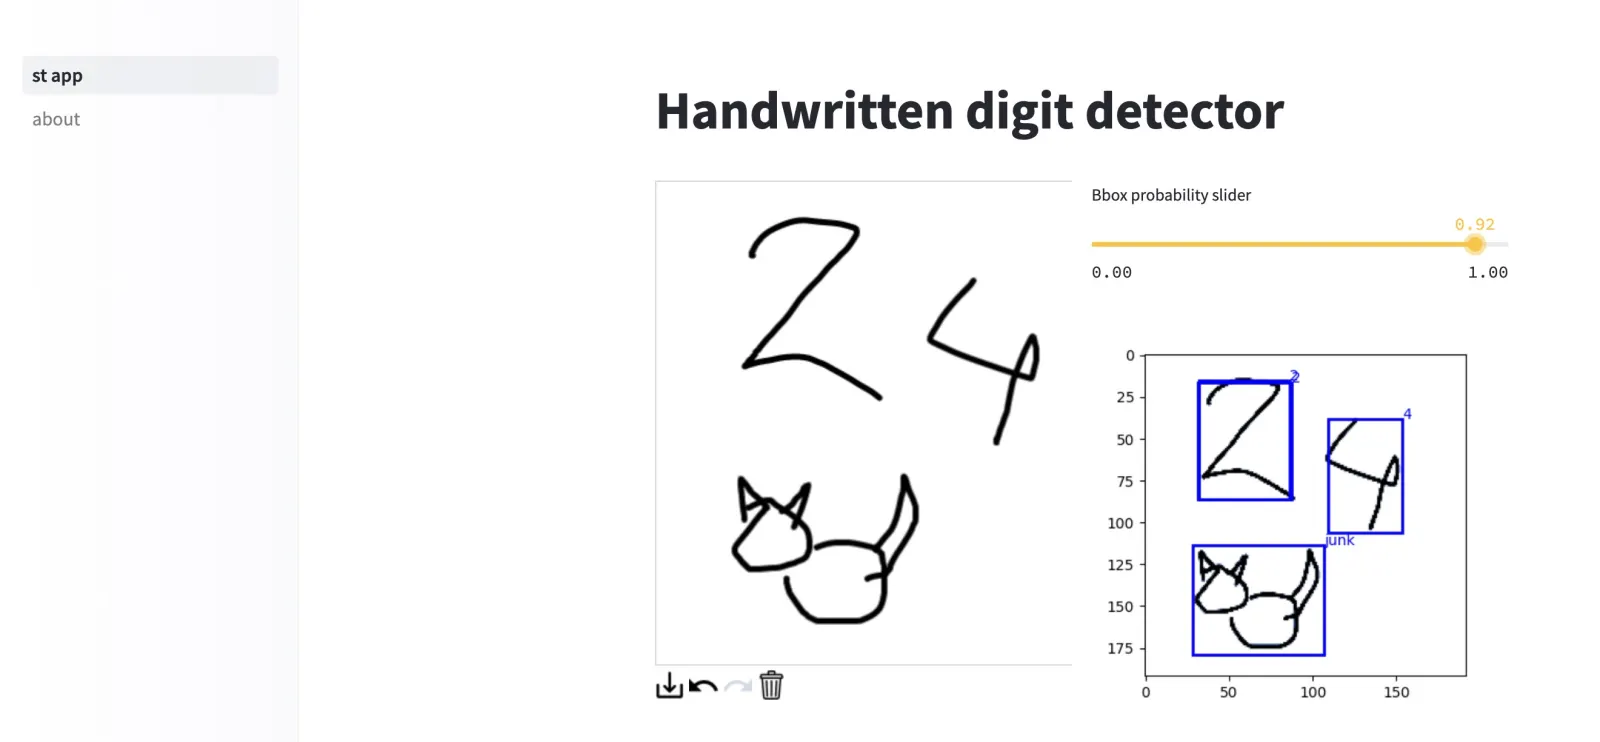
The first two versions were deployed on Heroku’s free plan, but in 2022 these plans were discontinued. I didn’t want my project to die because of nostalgia, so I developed a new version and deployed it differently. The current version has an object detection model (yolo3 written from scratch) and 12 classes (digits, other, and censored). If you want to know what does censored means, just try to draw something 😉
Initially, I considered deploying the app on Streamlit Cloud, but its computational limits were too low, so now the model is live on HuggingFace Spaces.
Now I want to share the history of these projects. I have written a blogpost in Russian about the project’s first version in detail. [Here] is a blogpost about the third version.
This is how the second version looked like:
The first project
Initial motivation
After completing the cs231n course in the spring of 2017 (as a part of a small self-study group), I wanted to do something like a final project, but with interactivity, so that anyone could use it. Also, I hoped to acquire or hone some practical skills on the way. So I have decided to try a simple project with several conditions. It would be digit recognition (a classiс problem), but training data should be collected by myself (using MNIST or CIFAR or some other data set wouldn’t be as interesting), and this should work online and be interactive - this means building a site. Additionally, I thought it would be cool if the model’s performance could change and improve based on the input.
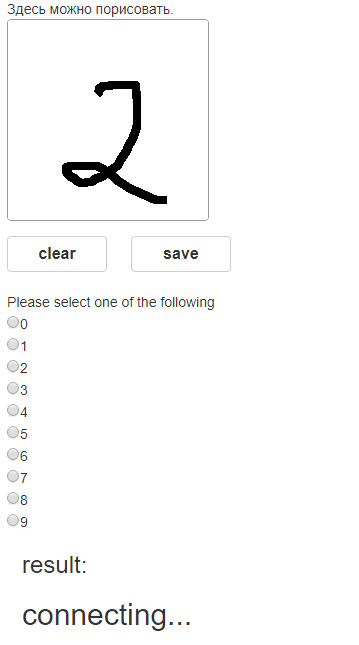
Setting up the basic site and collecting the data
There are several popular frameworks for Web development in Python; I was familiar only with Flask and decided to try it. It turned out to be quite easy to set up a basic site. Making a canvas for drawing turned out to be more challenging. In the end, I have found a code on Github which was simple enough, and it worked after some modifications. So the site had only canvas, radio buttons for selecting the digit, and buttons to save the digit and clear the canvas. Now the question was: where should the digits be saved. A good idea would be to save them online, but Heroku (I hosted the site there) doesn’t allow saving new files (only temporarily). I decided to upload images to Amazon.
It turned out that there are good packages for Amazon, which make things quite simple (namely boto). I was able to upload and download files from the bucket, though it took more time to integrate this into the site so that drawn images would be uploaded to the cloud. It took me several days to draw 1000 images. Then I studied the MNIST dataset images and decided to do the following augmentations: resize the image so that its width and height are increased/decreased and turning the image by certain angles. This results in 24 images for each original image.
Training the models
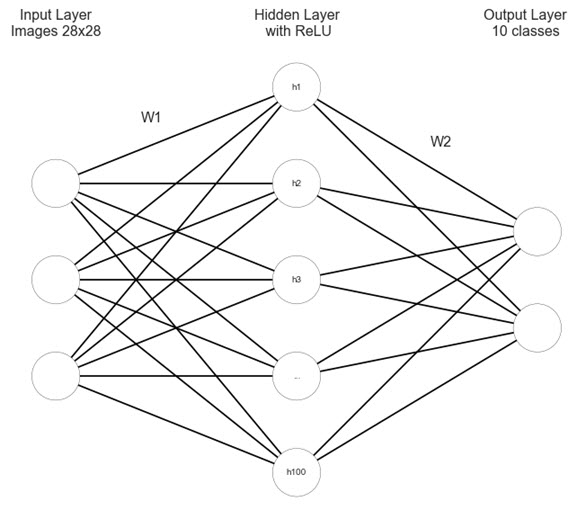
I had decided to try a simple feed-forward neural net at first (as opposed to CNN). This idea was inspired by one of the assignments in cs231n. After trials and errors, I decided that a two-layered net would be enough. The architecture was the following: a hidden layer with 100 neurons and ReLu activation, then the output layer with sigmoid activation. After creating the net itself, the next step was preparing it for online training so that weights could be updated for the new images. I used the same structure but removed learning rate decay. The accuracy was 58.95%, which isn’t as high as for models trained on MNIST, but it is a beginning.
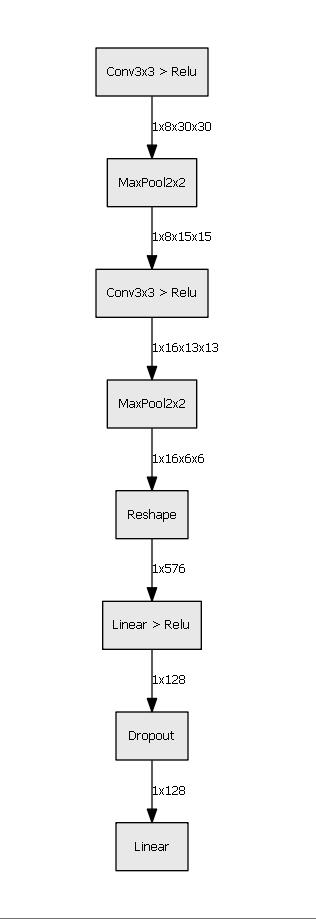
Building FNN with only NumPy is fun and everything, but better image recognition requires CNN. And writing CNN in NumPy isn’t fun at all. Tensorflow at that time was one of the most popular Python frameworks for deep learning, and I used it in this project. It took me a lot of tries and experimentations to create good architecture. Additional problems appeared because the model is saved not in one file but three; all of them should be saved and loaded together. The accuracy was 74.69%, which is much better than FNN but still not high.

Polishing the site
At last, it was time to make the site more presentable. The easiest way to do it was to use bootstrap. I chose a nice template and built the site using it. The most challenging part of it was to make the site look not too bad on mobile. Another tough spot was enabling drawing on canvas. It turns out that drawing with a mouse and with touches are quite different (who could have thought). I planned to have several pages with the the project’s description but decided to do it at the end of the project. Also, it took some time to implement and test onclick events for buttons.
Technical workflow of the app
The general workflow is the following: the user draws a digit and presses the button “Predict”. Javascript encodes the image into 64 bit encoded JPG URL, which is passed into Python. Image is decoded, and 4 machine learning models give their predictions. These predictions are passed back into Javascript, and it shows them on the page. After this user can confirm the correctness of predictions or input the correct predictions. Based on the checkbox value, models can be trained on this image.
If the model will be trained, the image is passed to main.py again. This time it isn’t simply processed but also augmented. It is resized based on its length and width, and then it is rotated by several random angles (angles are defined as figures in range (-30, 30) with a step of 5; 6 of them are randomly selected). Array with data for these 24 images is used to train FNN and CNN. Then updated weights are saved into the cloud.
Initially, I wanted to show the quality of predictions of MNIST after each training; but it turned out that Heroku can’t handle this amount of data in memory at a free plan. As a result, the information shown is hardcoded and is updated manually.
Problems and possible improvements

Not everything was working perfectly, of course.
- First of all, a lot of people drew icons, pictures or some other staff, but models had to predict some digit, so they were useless
- Some people spent time drawing digits and assigning them wrong labels so that my models retrained on them and became worse. This wasn’t good for the models, but I was thrilled that someone was interested in this project enough to spend a lot of time doing this;
- Even if someone drew several separate digits, the model still worked with a single image, so it predicted a single digit.
- And after more than a year since the start of the project, the updated TensorFlow weights became corrupted and couldn’t be loaded
I have decided to solve these problems using the following solutions:
- Train the model on 11 classes: 10 digits and “other”;
- Remove the code for online training. If necessary, I could retrain models on the new data by myself;
- Implement the possibility to separate several drawn digits into separate images;
- I wasn’t able to find any good automated solution, so if I see that the weights are corrupted, I manually replace them with the working ones;
The second project
Motivation for the second project
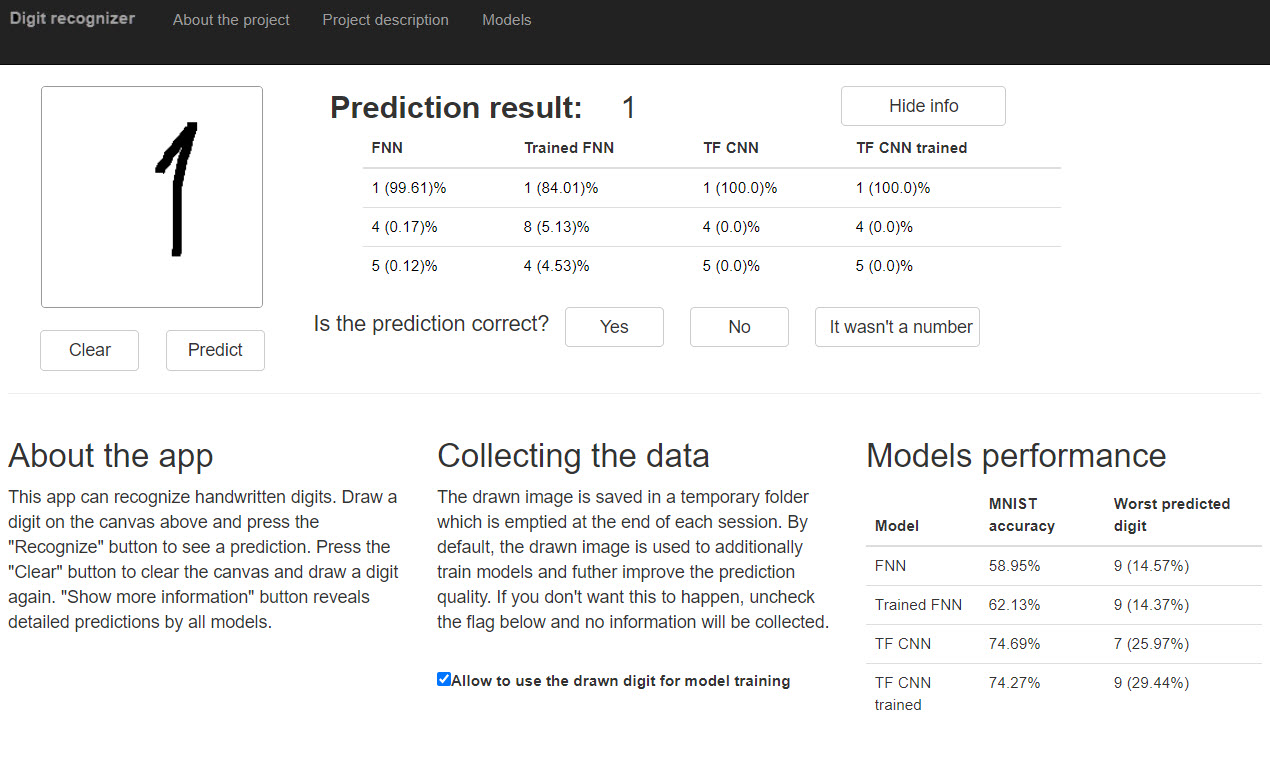
I completed the first version of this project in summer 2017 and since then wanted to create a better version. Several possible improvements in my mind: using other frameworks, recognizing several digits, and separating non-digits (as described in the previous section). Alas, I lacked the skills and free time to do this. Finally, at the end of 2018, an opportunity appeared: I was taking part in a Pytorch challenge course from Udacity and could do a side project. This app is that side project. It works using Pytorch and cv2.
Technical details
My final solution looks like this: cv2 for image detection and CNN in Pytorch on 11 classes to make predictions. At first, I use cv2 to find separate contours on the image and draw bounding rectangles. This way, I can separate all drawn objects on the image and work with each of them. I have trained a CNN with 2 convolutional layers on 11 classes (10 digits and “other”) with SGD optimizer and CosineAnnealingLR. It was somewhat tricky to train, considering the number of samples in the “other” category was quite low. Still, I achieved an accuracy of ~89% on validation data.
One of the interesting difficulties was the free Heroku plan’s limitations: I couldn’t install PyTorch because it took too much disk space. The solution was to install pytorch-cpu - it takes less disk space.
The third project
Motivation for the third project
The first two versions of the project were deployed on Heroku’s free plan, but in 2022 these plans were discontinued. I didn’t want to let the project die, so I decided to redeploy it. But simply redeploying the project on another platform wouldn’t be fun - I wanted to do something differently.
Tecnhical details
After some deliberations I decided to have an end-to-end solution and trained YOLOv3 from scratch. It is trained to predict 12 classes: 10 digits, “other” and a special class because some people liked drawing censored. As for the frontend part - I switched to Streamlit. It is much easier to make an app with it than with Flask if no complex things are necessary. Initially, I considered deploying the app on Streamlit Cloud, but its computational limits were too low, so now the model is live on HuggingFace Spaces.
Links: